Search This Blog

Wednesday, November 4, 2015

Fold Formed Leaves

Well, it's been awhile since I've posted.  I almost dropped off the face of the earth:  I had two partial knee replacements (and also got a new grand-baby and a new daughter-in-law!)  I haven't been going down the stairs to my workshop very much at all.

Meanwhile, here in Indiana we had a dry fall, which made for some beautiful leaves.  Unfortunately, there is no big hill around here that I know of to get a big sweeping landscape picture from.

Trees near my house

My first day that I could drive again, I had to go out and get some shots.  The leaves were at their peak and the rain that was expected that night would probably take a lot of them down.

It seems it always looks better in real life!


I have been wanting to get back into the studio and, inspired by the leaves, I wanted to make some fold-formed leaves.  This is something I've often read about but never tried.  So tonight I made a few.  Here are the results:


I probably went to a lot less trouble than some people.  First I cut out the rectangles with a pair of shears.  Then I folded them lengthwise and smacked them flat with a mallet.  Then I hammered with a textured hammer, especially getting around the edges.  This work hardened them, so they had to be annealed before opening.  Annealing them gave them some nice colors.  The four in front have the colors just from being annealed.  After opening, I filed and sanded the edges so they wouldn't be rough.  Then I flame-painted some more color on the two in the back.

Anyway, next I plan to drill some holes and make them into jewelry.  When I do, I will try and post some pictures.


Friday, July 3, 2015

Blown Away at Covington

Last weekend I was at the Covington Art Fair in Fort Wayne.  My husband always helps me set up, but he was going to be spending the weekend at some Boy Scout activities.  We took separate vehicles, and he only took my sandbag weights.  As I was leaving, I noticed it was starting to rain, so I threw in my pvc pipe weights just to be on the safe side.  It was odd, because I had been checking the forecast all week, and the weather was supposed to be nice.

So Friday night he helped me set up before he left.  We set up my EZ up with Florish mesh panels on three sides and sta-bars at the bottom to hold them, which give extra support.  We put on both sets of weights.  Here is what my booth looked like at the last show that I did:

My booth on a nicer day, in Louisville, KY


At least, that's what it looked like until I decided I got better sales by moving the cheaper items to the front and display cases to the back.  I was excited that I had just ordered three vertical banners with pictures of my jewelry to hang in the back of my booth.

Anyway, normally I set up my display cases the night before.  I had set up the legs and the wooden bases, but that's as far as I got.  My husband was in a hurry to leave, so I decided I would just set them up in the morning.  It rained all night long, and the wind seemed to increase.  I was sleeping in our little trailer, and it was so noisy on the roof I don't think I got any sleep at all.  I checked the radar a few times.  It showed nothing serious (green as opposed to yellow or red) and we were always on the back edge like it was just about over.

About 7:00 am I arrived back at Covington to finish setting up my booth.  As I pulled in the parking lot, I saw a couple of canopies had come down during the night.  This happens sometimes.  I was relieved to see mine still standing along with the others.  I went inside to start setting up.

After putting a couple of rotating displays up on the tables, the wind REALLY started to pick up.  It was scary.  I started holding the tent down, thinking that it will pass in a few minutes.  It didn't.  The wind got stronger and stronger.  Pretty soon water was pouring down on my head as I held on to the canopy leg as hard as I could.  I could hear things crashing outside -- apparently other tents were coming down around me.  

All of a sudden, I heard a siren.  Tornado warning???!!  It's time to abandon tent, I thought.  I was afraid to unzip the door of the tent, because it would let the howling wind in.  So, in spite of needing two knee replacements, I somehow was motivated enough to duck under the side wall.  Before I did, though, I quickly put both my rotating displays on the ground.  I got up next to the building where there is a large awning, and I took this video:


The siren I heard was apparently just a police siren.  I helped my neighbors get their last piece of painted furniture under the roof.  I still wasn't sure that we wouldn't have a tornado.  The roof above, all the way around the shopping center, was glass.  That is definitely NOT a safe place to be in a tornado.  So I went around the mall to see if the artist hospitality suite was open yet, pulling a few artists' possessions up under the roof as I went around.  If my tent was going to go, there was nothing I could do at this point.  I thought it was best to at least get in a building as soon as possible.  

The hospitality suite (an empty storefront) was open, fortunately.  After getting calmed down a little bit from my experience, but still soaking wet, I stepped outside the door and got another video:


Here is a still shot of the view from inside the hospitality suite:


Many of these artists had just lost their tents, and some of them had lost more than that, including their inventory.  They seemed to be taking it all in stride.  Everyone was so helpful to each other.  I finally got enough nerve to go back to the other end of the parking to see if my tent was still standing, and it was, but it was looking a little funny.  One of the cross braces had snapped, and the wind was still blowing.  Some other artists helped me start tearing off the sidewalls so the wind could go through.  As we were doing that, I stopped to take this picture, which shows the broken support hanging:


The table draped in black should be on the right hand wall.  The table didn't move, the tent moved.  The black legs you see sticking in the air are the legs to my display cases.  The green tub on it's side was full of display items, and it's not all that light.  The purple tub still upright is very heavy, and includes my display case glass.  You can see my weights still attached, but tipped on their sides.  My rotating displays, still wrapped in bubble wrap, were fine, though one had been knocked over on it's side.

I was going to text my husband, and let him know that my EZ-up had gone to a watery grave.  However, it was resurrected thanks to a couple of other artists.  Someone suggested that I salvage a crosspiece from one of the many destroyed EZ-ups that were now littering the parking lot along with several more expensive tents. Sarah Thompson, who's tent had blown over from the other side of the lot, was nice enough to give me one, and she and Troy Anderson actually even found a wrench and put it on for me!  

We took the tent down because of the wind.  Someone who counted said there were eight tents left standing.  I don't know if they counted before or after we took mine down.  Anyway, it did pretty good for an EZ-Up!  I read later that there were sustained winds of 50 mph, and gusts up to 70 mph!  The show was cancelled for the day.  After the rain quit, the clouds and wind stayed for several hours.  The whole thing lasted about 24 hours.  The storm just stayed in the same position and just rotated.  Since I was in no mood, or condition, to put that tent up a second time I opted to set up a couple of tables up under the roof next to the stores for the next day.  Many artists went out and borrowed or bought another tent and had it up for Sunday.

I hope I NEVER have an experience like that again.  But it was a learning experience, and here is what I learned:


  1. Weight your tent down good!  
  2. Most EZ Ups fail because water collects in the roof.  Domed roofs are superior, not because they are more aerodynamic, but because they shed water.
  3. If there is a chance of bad weather, don't set up glass display cases, or breakable inventory, the night before.  (Had my cases been set up, I would have lost all the glass.)
  4. If the weather is bad enough, it won't matter what kind of tent you have.  (Of the eight tents that survived, I know that one was weighted down with much hanging metal inventory, and another was tied to a large van that also blocked the wind.)
  5. Strongly consider the need to have at least liability insurance.  (Some tents are destroyed when they are run into by other tents.  When someone finds your tent in their spot on top of their tent, you will be liable.)
  6. I should have set up the tent again!  (It seemed as if I wasn't part of the show, and missed a lot of traffic, but I will know better next time!)
  7. Artists are a caring, helpful community!
In closing, let me say I was very fortunate because, assuming my lights and inverter dry out, I did not lose anything.  Many other artists were not so fortunate.  I am really hoping my next show is NOT a learning experience.  I've learned enough for awhile, now I just need a good show!


Thursday, May 7, 2015

Strategic Planning #2 - My Target Market

Well, my week at French Lick is almost over, and I have identified my target markets!

I knew that my jewelry, depending on the type, appealed to different people.  For this reason, I have been planning to split it into different online venues.  I just wasn't sure how to split it up, or which jewelry to put on which venue.  So I have been doing a lot of research online.  There's no point in wasting time and resources marketing to people who are not interested in what you are selling.

First you have to make a detailed list about the type of customer who buys your products:  Age, sex, race, income level, marital status, education, hobbies, etc.  I found this very hard to do.  But once I split up the types of jewelry I offer, then it wasn't so hard.

Apparently you should pick two main attributes of the customer, and one to three secondary attributes.


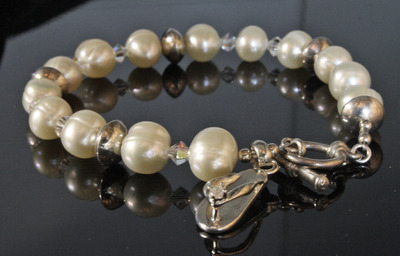
Flip Flop cultured pearl and sterling silver bracelet
For example, my target customer for a pearl necklace or bracelet is probably a bride.  Did you know the average age of a first time bride is now 27 years old?  So my target market for pearl jewelry is females between the ages of 25 and 30.  One of the secondary things would definitely be brides-to-be.


Abstract Bamboo Pendant, Fine Silver and Dichroic Glass


But this is not true for all the jewelry I make.  For example, my target customer for a one-of-a-kind fine silver and dichroic glass pendant is probably a married woman (or her husband) with a fairly high income level.


After listing all the attributes of your ideal customer, pick the two that best define him or her, along with up two three lesser important attributes.  You want to target your marketing to this person.  This exercise has been very helpful to me.  First of all, now I will be able to design my online stores to appeal to my different markets.  Not only that, I can use social media to target the appropriate customers for each shop.

If you haven't identified your target market yet, what are you waiting for?  I am sharing some of the articles I found helpful below.


How to Define Your Target Market
Find Your Target Market
How to Define Your Target Audience
How to Find Your Target Market


Sunday, May 3, 2015

Rest, Relaxation and Strategic Planning #1

I am hanging out in French Lick Indiana this week, communing with nature.  We had a timeshare week expiring, and my husband didn't want to use any vacation.  So he said, why don't you just go down to French Lick?  Some of you may know, I am a tax CPA.  I recently saw my doctor, and he made a comment, something to the effect of, "wow, you really let yourself go during tax season!"  It's true.  So I thought, why not spend a week just relaxing and trying to get back in touch with my creative mojo.  I also need to do some serious strategic planning for my handmade jewelry business.

So here is my creative home base for the week:


Friday night, when I arrived, a couple of ladies arrived next door and were having a little trouble getting their friends to hear them knocking on the door.  They all came from the Chicago area, and invited me over for drinks.  (Shout out to Betty, Linda, Marlene and the three Karens!)

I was starting to wonder if I would get anything done this week,  I didn't bring any jewelry to work on, because this week is about planning.  Some of the questions I have to answer are:

  • Who is my target market for which type of jewelry?
  • Which venue is appropriate for which type of jewelry?
  • Who buys jewelry on which venue?  (Etsy, Artfire, Storenvy, Aftcra, etc.)
  • How do I get in touch with my target market?
  • What display to use in my art show booth in addition to the display cases?
  • What possible themes could I use for next years jury photos?

Yesterday was day one, and I have made some progress.  (Also this morning I came up with a great idea for a video!)  After doing a little research online, I have learned this:

  • People of ALL ages shop online
  • Younger people spend more money online than older people
  • Men spend more online than women
  • Women tend to buy expensive jewelry as a gift, but not so much for themselves.

I will try to post updates of my progress using the painfully slow internet here.  But now it's time for my brain to change gears, so I will leave you with a video.  Not so much the video, but the audio is of all the birds singing outside my balcony even though I am right in town.  You may have noticed my ipod speaker in the picture above.  I turned it off just to enjoy all the racket the birds were making.  I hope you enjoy it too.


Sunday, January 25, 2015

Booth Shot for the Art Show Jury

Yesterday I spent pretty much all day long working on my booth shot.  Those of you who enter juried shows know that you usually have to submit three pictures of your work and one of your booth.  Sounds easy enough, but it's far from it.  You can't just take a shot of your booth at a show.  Your booth doesn't even necessarily have to be set up in the same layout as a show.  At a show, you set your booth up for the flow of traffic through your booth.  Here you are setting it up so the jury can see it.

If you are reading this as a novice, first of all let me say your tent/canopy must be white.  Most people go to Walmart and buy a cheap one for their first craft show.  They're always some color other than white.  Soon after they always end up having to replace them because almost all art shows require white canopies.  Last fall I happened to score some used Flourish mesh panels for my EZ Up.  (EZ Up gets a bad rap sometimes, but my EZ Up has held up where other, more expensive tents have not.) These panels not only help stabilize the tent, but you can also hang things from them.

Since I have some jury photo deadlines coming up at the end of the month, I have been watching the weather closely.  It has been really cold, and we have had snow on the ground.  Yesterday was my big chance.  My husband, who is the muscle, starting setting up my EZ Up in the morning, and I put in the floor and the display cases.  He had set it up in the driveway, with the door facing the house.  Actually a pretty good idea, I thought, because it's much more secure when I set all the jewelry out.  

What I failed to consider was the location of the sun.  Actually it wasn't that I didn't consider it, I just thought it wouldn't matter inside the tent.  I was wrong.  It was supposed to be cloudy, but by the time we were set up, the occasional cloud that came by was higher in the sky than the sun was.  Up north in the winter, the sun is low in the sky to the south from sunrise to sunset.  Our driveway pretty much faces south, which means the back of my tent was to the sun.  I never realized that the tent does not really block out the sun.  Here is my first shot:


Ok, this looks awful.  I know it.  And it looks even worse in the photo than it does in real life!  You can't see it, but I am shooting right into the sun.  Would you go into this booth?  Probably not.  By the way, this is also the spare EZ Up that came with the sides.  It isn't as clean as my regular one, and you will notice that when it is fully up, the side walls don't reach the ground.  That's ok, because I can fix that in photoshop.  

We have only two of the Flourish panels up, in the rear and the right hand side.  I was planning on hanging a couple of displays on the panels, but once I saw the size of the holes I knew it wasn't going to work.  That's ok, I have a plan B, but it wasn't going to be ready before the end of the day.  No big deal.  This is why you always set things up before you use them, so you don't get any surprises on show day!

My next step was to upload the picture online and get some advice from some other jewelry artists.  Based on their advice, we moved the display cases so they were staged for the picture.  They also suggested I add a rug.  Now I have seen these big rugs, and I have no intention of hauling one of those around.  My husband said he knew of a rug that had just been sitting around in the basement, rolled up since we moved (years ago.)  So we added it.  

After we got the feedback and made the changes, the sun was beginning to go down, and the lighting totally changed.  My DSLR camera was on a tripod, and I put it on a self timer so that there will be no motion from me clicking the shutter button.  That way it can do a long exposure if it needs to.  Here is the last picture I took before editing:


The improvement is amazing.  All we did was rearrange the cases and add the rug.  But the lighting is also a huge improvement.  I love how the rug adds some color, and it's small enough that I can take it to shows.  By the time we got this done the light was fading fast, so this one will have to do.  Here is the final image after cropping and editing:


That is a booth I would go into!  Before next year I hope to add some sheer curtains in the corners to hide  the poles, and three large jewelry photos across the back of the booth.  For now it will have to do.  But we certainly hit the "sweet spot" in the weather because today, as you can see, we got more snow:


For those of you contemplating your own booth shot, I will leave you with a link to Larry Berman's article on the subject:  http://bermangraphics.com/artshows/photograph-booth.htm